Tuesday, December 31, 2013

Look Out For Bears!

We woke up yesterday morning and found that some critter had knocked our birdbath completely over, denting the edge of the basin and knocking the water wiggler across the path.  Since it's a fairly substantial birdbath, it had to be a fairly substantial critter that did it.


That started us wondering what animal could have done this.  I don't think that even the big papa skunk we've seen around is big enough to do it.  A large raccoon could probably tip it over, or possibly the neighbors' cat could have jumped up on it, but there seemed like a lot of destruction for that.

Then we found a strange track in the decomposed granite pathway.


The track was about four inches wide by about four inches long and appeared to have at least four separate toes and possible a fifth toe, too.  We couldn't see any claw marks in the DG, but it's probably too coarse a texture for that, anyway.  

That started me off on an internet search of tracks of various animals that could have done it:  dog, coyote, cougar and bear.  The bear tracks at the San Diego Natural History Museum look the closest to what we saw, considering the size of the track and the number and width of the toes.

It's really hard to believe it could be a bear, considering that we live in a city of 1.3 million people, surrounded by freeways, but that was our reaction to the suggestion that deer had chomped our citrus trees, until a deer crashed through the IHOP window a few miles away.  

However, my brother, who is familiar with the tracks of many different types of critters, says he thinks it was most likely a large dog; a bear would probably have also trashed our bird feeder, especially the suet feeder, and there would probably have been a lot more digging in the raised beds. 

O.K., so maybe it's a dog, but we're going to be pretty cautious about going outside at night from now on.   

Monday, December 30, 2013

Christmas in Indiana

Cindy and I traveled to a family Christmas in Indiana this year, arriving to find snow on the ground.  It was beautiful driving through the monochromatic landscape, with the full moon shining on silvery sheets of snow.  

Then it rained for three days and the snow melted away, but it snowed again on Christmas Day.

Christmas Day Cornstalks
Not much gardening going on in Indiana at this time of year.

Lake Waldron--Yes, It's Frozen

Snow is wonderful to look at, and even more delightful to leave behind in Indiana.


Sunday, December 15, 2013

Scene of Destruction

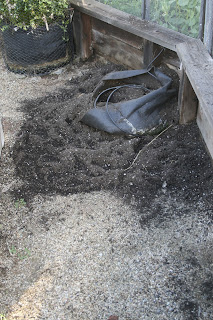
Some enterprising varmint, probably a skunk, got into one of Cindy's grow bags last night and dug all the dirt out of it looking for edible grubs.  Fortunately, Cindy had already harvested all the potatoes that formerly were in that bag, so the critter didn't get any of those.

Since there was nothing in the bag, Cindy had taken off the plastic fencing that was around it, giving the varmint a clear field for its excavations.

The skunk must have had a lot of fun as it dug most of the soft potting soil out of the bag and spread it all over the decomposed granite (DG) of the pathway, leaving little skunk paw prints in the dirt, but that made it difficult to sort the soil from the DG.  Not so much fun for the clean-up committee.
Dirt All Over The DG Pathway

This little episode makes it very clear that we need to continue to practice exclusion of varmints from the growing beds; we certainly need to get the new area finished before the ground squirrels wake up from hibernation and the blueberries start ripening.  Those ground squirrels loooooove those blueberries.

At least this varmint didn't get any of our potatoes.  Those are MINE!


Sunday, December 8, 2013

New Butterfly

Miss Blueberry
The new butterfly
Tries her wings, flutters,
And then lets go of the branch.

The butterfly that had formed her chrysalis on the blueberry bush hatched out successfully the other day.

She spent about a day spreading her wings and drying them in the sun, and taking short test flights.  Then she finally flew off.

Sunday, December 1, 2013

Trouble

The trouble with obsessing with butterflies and caterpillars is that sometimes things don't go well, and that gets depressing.

The Monarch chrysalis on the twist tie on one of Cindy's panels finally opened today and the butterfly crawled out, but it was clearly damaged.

When the butterfly emerges from the chrysalis, its wings fill with fluid and expand to its normal size.  However, this one never really expanded properly and the right wing remained crumpled.  I used a leaf to try to help it straighten out, but it never did so.

We had been concerned about this chrysalis for some time because the chrysalis had become very dark, almost black at the top.  It's normal for them to get darker shortly before they hatch and you can usually see the orange and black of the wings inside the chrysalis, but this one was darker than that.  This chrysalis was in a position exposed to the elements and there was some fluid on the chrysalis after the hard rain we had a couple of weeks ago, so it simply may not have had enough fluid left to survive.

Although that butterfly obviously isn't going to make it, other caterpillars are industriously looking for places to attach and form their own chrysalises.  I found this one trucking along close to where the damaged one had attached, so I gave him a ride onto the boxwood hedge; that should be a more hospitable place for him to attach and form his chrysalis.
Caterpillar in the Boxwood

Sunday, November 24, 2013

Babysitting Broccoli


November is supposed to be cooler than summer, although you wouldn't know that lately; a couple of weeks ago, it was in the 80's in San Diego.

Then we got some rain, which is very helpful.

When I took these pictures of Cindy's square foot garden frame, I didn't realize that only some of the veggies that were sprouting were ours; the ones in the white plastic trays belong to a neighbor and fellow Master Gardener who was going on vacation for a couple of weeks.  Since he was afraid they would all die while he was gone, Cindy volunteered to babysit them for him, and they did very well.  He gave us some of the plants when he retrieved them, so we'll have plenty of winter veggies.

Who knew broccoli needed babysitting?  

Wednesday, November 13, 2013

Herding Caterpillars

Many Monarchs
We've been complaining all summer about not seeing any Monarch caterpillars, but in the last couple of weeks we've seen a number of Monarchs, but also the Giant Swallowtail caterpillar on the citrus and an Anise Swallowtail caterpillar on the parsley.

The Monarchs are all over the Asclepia plant that came up as a volunteer in the corner of the big raised bed in the back yard, but they don't seem to be able to find a good place to form their chrysalises.

The first one evidently crawled along the top of the panels until it came to the farthest corner of the bed, then went out on the twist tie that keeps the panels together to form its chrysalis.
Really?
We put a couple of stakes across the top of the panels to give the others a little more solid place to attach, but did they do that?  Nooooooo, not one of them has used it.
A Little Help?  

The second one crawled completely out of the bed and ended up attaching to the bottom of one of the patio posts.

So when we saw the third one busily crawling along the pathway in the general direction of the patio and tried to climb up the side of the water tank, we decided to try to encourage it to find a better place to attach.
No, Not There!

We finally got it on one of the blueberry bushes, where it curled into its "J" shape and formed its chrysalis.
Finally Found A Place
So we'll see if any of them hatch out successfully.


Sunday, November 3, 2013

Giant Swallowtail Butterfly

Giant Swallowtail 
My friend Kris found a butterfly lying in middle of the street one morning, apparently dead.  It was a cool morning and some butterflies will go dormant if the temperature is too low, so she picked it up and placed it in the sun, where it eventually revived, tested its wings and flew off.

She sent me a picture of it and asked if I knew what kind of butterfly it was. Thanks to our handy dandy Butterflies of Southern California guide, we identified it as a Giant Swallowtail, Papilio cresphontes.

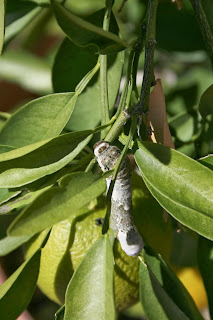
Yesterday Cindy came in with a leaf from one of the citrus trees with an incredibly ugly creature on it.  We weren't sure at first whether it was a worm, a slug or a caterpillar, but thanks to the same butterfly guide by Jim Brock, we identified it as the larval stage of the Giant Swallowtail.

Citrus trees are the host plant for this butterfly, and the larva are well camouflaged as citrus twigs or branches as they devour the leaves.
Giant Swallowtail Caterpillar

We carefully placed the caterpillar back on the citrus tree so it can continue to munch its way along toward metamorphosis.

It's amazing that something so ugly can turn into a beautiful butterfly.

Caterpillar on Citrus Leaves

Photograph of Giant Swallowtail copyright Kristin Shipley, used by permission.  All other photographs copyright Kay Teeters.  All rights reserved.

Friday, November 1, 2013

Perfect Gardening Attire

Ghillie Suit
I think I've finally found the perfect gardening attire for the resident Master Gardener.

It's a ghillie suit, and there's absolutely no way she could get it dirty, so I would never have to wash it.  Dirt or leaves on it would just add to the general effect.

Might itch a bit, though.

Wednesday, October 30, 2013

One Word

Limes
One word:  Tequila!

These may not look much like it, but these fruits are the harvest from our lime tree.

We've had really strange luck with the three dwarf citrus trees Cindy bought four years ago.  She thought she was buying a Meyers Lemon, a seedless lime and a Blood Orange tree (see Of Lemons And Limes), but the presumed lemons steadfastly refused to turn yellow, so we eventually concluded they were actually the limes.

Then, about a year and half ago, some critter stripped almost all the leaves off both this tree and the presumptive Blood Orange as well (see New Garden Mystery).  As intriguing as the image of the elderly neighbor next door running amok with her garden shears was, we eventually concluded that it most likely was a deer that did all the damage, especially after another deer crashed through the window of the IHOP a couple of miles down the San Diego River from us.

The trees recovered and actually came back more vigorous than before, but so far this is the only one that has produced very much fruit.

Although they are yellow, they really are limes.

So now the question is what to do with them.  Did anyone say Margaritas?

Sunday, October 20, 2013

Other Gardens

Pomegranates
Cindy got a call from a neighbor recently wanting some advice about her rose bushes, which she thought might have a fungus, so Cindy put on her Master Gardener name tag and went over to look at the plants.  It turned out that the neighbor's gardener had used a fungicide product on the plants, which were already stressed from lack of sufficient water, that hadn't done them any good.  As a precaution Cindy took specimens over to County Ag which eventually confirmed Cindy's opinion that it was not a fungus but the fungicide that did the damage.

So the neighbor gave Cindy some pomegranates.  Neither of us had ever had pomegranate seeds before, so it was a new experience for us.

My next door neighbor when I lived in northern California had a pomegranate tree (Punica granatum) and I used to watch the squirrels perform entertaining acrobatic acts to get the pomegranates.  One squirrel in particular would flip upside down and hang from the branch by his back feet while he ripped off hunks of pomegranate; then he would flip back up while he ate the seeds, repeating the process until he had stuffed his cheeks.

This article from the San Diego Edible Garden Society has more information on pomegranate varieties that do well in this area:  http://www.sdedible.org/pomegranate-trees.html.


Sunday, October 13, 2013

A World Without Butterflies

Gulf Fritillary
We get a lot of pleasure watching the butterflies in our garden, hopefully enjoying the various butterfly-friendly plants we've included in the garden.

The other day while I was looking in vain for Monarch caterpillars, I did see several other species, including a Gulf Fritillary (Agraulis vanillae), a Painted Lady (Vanessa cardui), a Fiery Skipper and one of the yellow Sulphur type butterflies, probably a California Dogface (Zerene eurydice), although it was moving too fast for me to get a good look at it.

I found that very encouraging after the absence of Monarch caterpillars.
Painted Lady

A world without beautiful butterflies would be too bleak to contemplate.

Wednesday, October 9, 2013

A Garden Without Caterpillars

Monarch Caterpillar
We've had plenty of Monarch butterflies visiting our front yard butterfly garden all summer, but until recently we had seen no Monarch caterpillars.  The Asclepia plants are all thriving this year, although by now they should have been nibbled down to bare stalks by the caterpillars.

We would think it was just our yard, but other Master Gardeners in San Diego are reporting the same problem in their gardens:  no Monarch caterpillars.

We saw two small ones about a week ago, but they are gone now.  They were both too small to have pupated already, so something is clearly still nobbling our caterpillars (I learned that word from watching the delectable British TV series Pie In The Sky).

It might be the Lesser Goldfinches, as we saw one trying to imitate a hummingbird as she attacked a huge Tomato Hornworm in the back yard a couple of weeks ago.  She wasn't afraid to go after that enormous worm, but she also didn't succeed in getting it off the tomato vine.

Another suspect is the same one we considered last year at this time:  wasps.  We haven't seen any of the Mud Dauber wasp nests this year, but the Paper Wasps in the back yard not only revived their old nest from last year, but also constructed a large three part wasp condo under the patio cover.  You would think they could have taken out that hornworm, but noooo.

One thing I don't think we'll try again is the caterpillar cage we tried last year when we were having the same problem (See Co-dependent to Caterpillars, Part II).  As the subsequent posts from October and November of last year show, that effort was pretty much of a disaster, so I think they'll just have to figure it out on their own.

We'll probably have to hire a pro to get those wasp nests down, though.

Tuesday, October 8, 2013

Beans, Beans, Beans

Last of the Pole Bean Plants
Cindy's Pole Beans did very well this year; she planted Blue Lake and Kentucky Wonder, and both varieties produced LOTS of delicious beans.

But the plants are done for the year and she pulled the vines out this week.  She decided to leave on the vines some of the pods that grew so large while she left me in charge of the garden for a couple of weeks this summer (see "The Three Foot Long Green Bean").

Dried Pods and Beans
There weren't any that were quite that long, but the longer pods tend to be tougher to eat, so she left some of them to dry out on the vines to provide seeds for next year's garden.

The pods were so dry they crackled like paper when we broke them open to remove the beans, and the beans themselves had a tendency to shoot across the table when the pods were opened.

Blue Lake and a few Kentucky Wonder Beans
The white beans are the Blue Lake and the brown ones are the Kentucky Wonder; the whole lot of them weighed in at a pound and a half of beans.

That seemed to me to be quite a lot of beans, more than the quantity it seems reasonable to assume you might want to plant in a relatively small garden, so I suspect there will be a recipe or two involving dried beans in the near future.

Or maybe we'll have bean soup sometime this winter.

Saturday, October 5, 2013

Plenty of Pumpkin


The pumpkin harvest is in, and it looks like we'll have plenty of pumpkin for the fall and winter.

We had pumpkin soup for lunch the other day, thickened with rice.

Yummy!

Thursday, September 26, 2013

Another Bug

As Cindy was gathering the last of the Champion tomatoes this morning, she found another unusual looking bug on one of the tomatoes.

It was about 5 millimeters long, with a black body with a pattern of white and yellowish spots on the body and orange spots on the side by the head.

It was about the size and shape of a Lady Bug Harmonia axyridis, but the spots were the wrong color and pattern.
It was actually a very pretty bug, but the fact that we found it on the tomato plants was a matter of concern.
Southern Green Stink Bug Nymph

So, was it a beneficial bug, or was it the harbinger of another invasion of pests?

I posted these pictures on BugGuide.net and it was quickly identified as the nymph of a Southern Green Stink Bug, Nezara viridula.  This nymph is probably in its the second instar; eventually the adult bug will become all green with an elongated shield shape.  The pattern of dots on the nymph is where the wings will form on the adult.

With the identification we found that the bug is definitely not a beneficial bug and is considered "an important pest of vegetables and field and orchard crops, especially legumes and crucifers."

While we're not growing cotton or peanuts, we do intend to keep growing tomatoes and Cindy is just about ready to start her winter crops, many of which are crucifers.

I think Cindy has been feeding the birds too much; they should be eating some of these bugs.


Wednesday, September 25, 2013

Keelbacked Treehopper

Nymph
The San Diego County Cooperative Extension Farm & Home Advisor office came through with an identification of the strange looking bugs we found on our Iochroma plant.  Cindy dropped off a bag of them at the County Ag office last week and they have now been identified as nymphs of the Keelbacked Treehopper, Antianthe expansa.

The nymphs are these brown strange-looking, pig-snouted, spiny, wingless bugs.  The adults are a bright green color and can be mistaken for small leaves.

In addition to the Iochroma, their preferred food sources include other members of the Nightshade (Solanaceae) family:  tomatoes, tomatillos, potatoes, peppers and eggplant.  That's not good news for the garden, since much of our produce comes from these plants.


Infestation
Worse yet, other types of Treehoppers apparently like to lay their eggs in slits in the woody stems of plants so the species can over winter in the mild California climate, and the Iochroma plant seems ideal for this purpose.

So it looks like we'll have to figure out how to get rid of the nymphs before they become adults and breed even more of them to eat our vegetables.

Adult Keelbacked Treehopper

Hard to Spot Them

Wednesday, September 18, 2013

Strange Bugs

Iochroma
Our neighbor knocked on the door yesterday and told us that our purple Iochroma was covered with strange looking bugs.

We thought at first they might be aphids, but on closer inspection they looked different from the usual sort of aphid we have all over the Asclepia in the butterfly garden.

Ants tend the aphids for the honeydew they secrete, and these insects also had ants close by who appeared very interested in them.

The majority of the bugs were quite small, about two millimeters long, although there were a few larger ones about four to five millimeters.  The larger ones were rounder, with yellowish bodies and what appeared to be long, pig-like snouts.  They're pretty tiny, but they look like they should figure in a science fiction movie.


So what are these things?  Hairy aphids?  Punk versions of a Leafhopper nymph?  Pig-snouted, spiny sap-suckers?  

Cindy dropped a bag of them off at the San Diego County Cooperative Extension Farm & Home Advisor office, aka County Ag. this morning.  The entomologists there should be able to identify the bugs and will send Cindy a report by e-mail in a few days.  

They really don't look like anything beneficial, and there are a LOT of them.  


Monday, September 16, 2013

A Tasty Snack...For The Birds

Hornworm In Action
We were having lunch on the patio the other day when Cindy spotted a yellow bird among the leaves of the tomato plant nearest us.  The bird was a female Lesser Goldfinch, and at first we thought she was trying to add some salad in the form of tomato leaves to the Niger Thistle seed from our feeders.

As we watched her trying to hover in the air as she pecked at some of the leaves, we realized that she wasn't after leaves at all; she was after the enormous Tomato Hornworm that was chowing down on the tomato leaves.

She managed to take a pretty good chunk out of the Hornworm, but she flew away before she actually got the Hornworm off the branch, although that was enough to draw our attention to its presence.

Since we thought that was by far the best way to dispose of this pest, Cindy clipped the leaves off the tomato plant and left them, with the damaged Hornworm, under the bird feeder for the birds to finish off.  After about an hour, there was no sign of the Hornworm, so somebody took care of it for us.

Hornworm Down
A tasty snack for them and no more damage to our tomato plants.

Tuesday, September 10, 2013

A Story

While I was writing the series of posts about construction of the varmint panels, Cindy reminded me to add a power drill to the list of tools used to construct the panels.  You need that to drill pilot holes in the plexiglass and to drive the screws into the 1 x 1 wooden stakes.

 Years ago, when Cindy was constructing the very first set of panels, she first tried using nails to secure the plexiglass to the stakes.  That idea didn't work too well-- it was tedious, time consuming work and the nails tended to rust and pull out through the plexiglass, so she decided to use the zinc screws instead.  With the wider heads on the screws, they don't tear out of the plexiglass like the nails did.  You could also use 3/4 inch zinc wood screws with washers, too.

So she borrowed my electric drill to drill pilot holes in the plexiglass and drive the screws into the wooden garden stakes.

After she had driven about half a dozen screws in, I asked her how it was going and she told me she didn't think the drill was very powerful because it took so much effort to drive the screws in.

I took the drill, flipped the switch from "reverse" to "forward" and gave it back to her.

It worked much better in "forward", but she must have driven all those first screws on sheer arm strength and will power.

Saturday, September 7, 2013

Cindy's Varmint Panels #6--Construction of the Panels

Construction of the panels is pretty simple.  You need a supply of 1 x 1 wooden garden stakes, hardware cloth, plexiglass and screws.  A power drill/screwdriver is really helpful, and if you have to cut any of the plexiglass, you will need a jigsaw or saber saw to cut it.  We've tried scoring and snapping plexiglass and it just didn't work for us.

The screws we use are zinc #8 3/4 inch self-drilling phil mod truss lath screws; the zinc won't rust and the wider head of this type of screw distributes the pressure over a wider area of the plexiglass and also is wide enough to capture quarter inch hardware cloth.

Panel With Center Support Piece

The number and size of panels you will need will depend on the size and shape of your raised beds.  Our first raised bed was roughly L-shaped and required a lot of carefully tailored panels to enclose it.  

Each panel consists of two upright stakes, two cross stakes to make the bottom and the center of the panel rigid, hardware cloth on the bottom and plexiglass on the top part of the panel.  Measure the distance between the PVC tubes you screwed to the insides of the raised bed to determine how wide each panel should be, or, if you haven't installed the pipes yet, construct the panels and then mark the location of the stakes on the inside of the raised bed so you know where to locate the PVC pipe.  The plexiglass and the hardware cloth must be screwed onto the outside of the stakes, otherwise the varmints can crawl right up the wooden stakes to get into the garden.  The smooth plexiglass on the upper part of the panel prevents them from getting a handhold at the top of the panel, and the hardware cloth below allows air to circulate through the garden.  

Leave about six inches of stake at the bottom of the panel to insert into the PVC tubes secured to the sides of the raised bed, and leave about two inches at the top.  We secure the panels to each other with twist ties at the top of the panel stakes to keep them in place but make them easily removable when we want to get into the bed to tend the plants or harvest the vegetables.


Your panels should be able to slide into the PVC tubes and fit behind the sides of the raised beds closely enough that most of your resident veggie-eating neighborhood critters can't squeeze into gaps and get at your plants and vegetables.  

Constructing these panels takes some work, but it means that you get to harvest the vegetables you've spent time and effort growing.  
  

Friday, September 6, 2013

Cindy's Varmint Panels #5--The Next Steps

The next step in construction of the anti-varmint system is to install your irrigation system connections, because those will probably have to run under the sides of the raised beds and through the hardware cloth barrier.  The final configuration of the irrigation system will have to wait until the soil is in the bed, but the connections should go in before the soil does.


Another step before the soil goes in is to use galvanized pipe strapping to secure PVC pipes to the inside of the beds in the corners and wherever you may want a support stake for a large panel.   These tubes will hold the panel stakes.  Tip:  make sure the PVC pipe you use is large enough for the garden stakes you will use to fit inside the pipe.  Also, wait to secure the PVC pipes until you've constructed the panels; it's easier to adjust them than it is to re-cut a panel.

For the first few years that we had this system, Cindy simply drove the stakes into the soil of the beds when she wanted to replace them after she had removed them to tend to the plants.  This became very tedious and she came up with this solution, which has made removal and replacement of the panels much easier.


This picture shows a corner with two panels inserted into their tubes.  

Then it's finally time to add the soil.  If your soil is as horrible as San Diego's soil, which is composed mostly of sand, clay and lots of rocks, it's well worth your time to buy some decent soil for your garden.    Cindy also enriches the soil each year by growing a cover crop that can be chopped up and mulched back into the soil to provide additional nutrients.  


Next: Construction of the Panels


Thursday, September 5, 2013

Cindy's Varmint Panels #4--An Essential Tool

Since construction of the raised beds and the panels involves using a lot of hardware cloth, it's well worth the effort to get a tool that cuts through hardware cloth like buttah.


It's the SKIL Lithium Ion Power Cutter 2352-01.

It's compact, lightweight, holds its charge well and will zip through hardware cloth and save your knuckles while it's doing that.

Cindy wouldn't be without hers.

Wednesday, September 4, 2013

Cindy's Varmint Panels-- #3, Hardware Cloth, A Necessary Step

Once you have built the sides of your raised bed, the next step is to prepare the bottom of the bed before you add any soil to it.


If you used landscape fabric to kill off the grass under the bed, cut it out of the bottom of the bed, but leave the fabric under the sides of the bed and the surrounding walk way.  This will help keep grass and weeds from encroaching on the bed from outside the bed.  

We initially left the landscaping fabric under our first bed, thinking it would prevent grass and weeds from growing up into the bed.  However, we discovered that weeds weren't that much of a problem and the fabric was also preventing beneficial earthworms from entering the beds;  by cutting out the fabric from the bottom of the bed, earthworms are able to pass through and aerate the soil.  

The next step is even more important:  the bottom of the bed must be lined with quarter-inch or half-inch galvanized hardware cloth and it must be stapled to the inside boards of the bed.  

We did this with the first and second sets of raised beds we constructed, but when we built the raised beds in the picture above, we decided to skip this step, thinking it was overkill.  Because that bed is in shade much of the day, Cindy used a mylar mulch to increase the amount of light her green beans received.  Later that summer, she noticed that the bean plants seemed to be dying; when she inspected them, she discovered that gophers had tunneled under the bed and thus under the panels and chewed off the plants at the roots.  The mylar mulch had provided an excellent cover for their covert activities and the lack of hardware cloth on the bottom of the bed allowed them to do it.

That meant she had to dig all the soil out of the entire bed and retrofit it with the hardware cloth, not an easy task.  

We won't skip that step again.  


Tuesday, September 3, 2013

Cindy's Varmint Panels--From The Ground Up

Cindy uses a system of plexiglass and hardware cloth panels to exclude tomato-eating critters from the vegetable garden, but construction of the system starts from the ground up.

The first thing we did was to get rid of the grass lawn.  There are various ways to do this; since we planned to grow vegetables, using an herbicide was not an option, so we put down landscaping fabric to kill off the grass months before we planned to start constructing the system.


First Raised Bed
The next step is to construct the raised beds.  Using raised beds prevents varmints from digging under the panels to gain entry to the veggies on the other side.  The raised beds don't have to be too high--it's really a matter of how high you want them to be.

The first set of raised beds that we constructed was made from 2 x 6 boards stacked three high on top of each other, with 4 x 4 posts sunk in concrete on the outside of the boards every few feet to bolster the sides of the beds and insure that the mass of dirt in the beds did not cause the sides of the beds to collapse.  We also ran another 2 x 6 around the top edge to form a seat, but that proved not to be too practical for that purpose, as it's not really wide enough to sit on comfortably.

We used some plastic interlocking corners that allowed us to make them any angle we wanted, but we could have just screwed or nailed the corners together.  One thing we discovered with subsequent raised beds is that if you put your support posts on the outside of the bed, rather than on the inside, it makes it easier to construct the panel system and install the irrigation later.  

Ask us how we learned this.  


Monday, September 2, 2013

Cindy's Varmint Panels

We live on a canyon that is home to many different types of wild critters, from large animals such as coyotes, deer, Tree Foxes, raccoons and skunks, to smaller animals like the California Ground Squirrels, rabbits, canyon rats and gophers.  The problem with having a vegetable garden is that many of these animals also like the vegetables we grow.
Critters Like Tomatoes, Too.

We absolutely refuse to resort to poison to protect the garden from these critters, so that leaves exclusion as our only means of protecting the vegetable plants and fruit from the varmints that would love to eat them.

Cindy has spent a lot of time over the past fifteen years devising a system that will keep the vegetables safe from the varmints, but allow her easy access to the plants and the vegetables.  She has created a system of protective panels made from plexiglass and hardware cloth that do this pretty effectively.  

We were asked recently to provide some pictures of the panels so that the school garden program might be able to learn how to use similar panels.  I though it might be helpful to make that information available here, so I'm going to spend the next several blog entries talking about Cindy's panel system.

Please keep in mind that I hold the copyright on all pictures on this blog and they may not be used or reproduced in any form without my permission.  

Sunday, September 1, 2013

Japanese Eggplant

Japanese Eggplants
I thought these Japanese Eggplants were very interesting looking, but it turns out that the spines are sharp and prickly, so they have to be approached with caution.

I love the variegated purple and white color of the skin of these vegetables.

Somehow, I suspect there will be an eggplant dish on the menu soon.

Wednesday, August 28, 2013

The Three-Foot Long Green Bean

Cindy was off visiting family members in the Midwest for a couple of weeks, which left me nominally in charge of the garden.  She picked all the ripe tomatoes and green beans before she left, but I told her  there was no way I could keep up with the beans.


The problem with green beans is that if you don't keep picking them, the beans that are already on keep growing, but the plants slow down production and may stop producing altogether.  I told her she would come back and find they had grown so much they were three feet long.

I did pick some of the  beans and some friends came over and helped out, but there are probably some out there by now that are pretty big.

Maybe even one that's three feet long.